Bruce Katlin Creates And The Running Artist

Sunday, November 11, 2012

Filling A Glass With Ice Can Be Very Difficult

Filling a glass with ice seems like a very easy task, right? Grab a handful of cubes and toss em in. That's all it takes, right? Depends. If you're like me and sometimes make things more difficult than they really are, then filling a glass with ice can become very complex. 

Suppose you've interested in knowing how many cubic inches each cube takes up in the glass in order to determine how many cubes you'll need to satiate the thirsts of twenty friends coming over for a dinner party? (You hate waste, even frozen water) And just suppose, that you're really curious to know the the structure of ice and the amount of hydrogen each cube holds? 

You're probably thinking to yourself, "What on earth would you want or need to know that for? Just fill the freakin' glass with ice and if you have any left over, put it in your freakin' freezer until your next party!" And I'd have to agree but it's an example of how something to simple can become so difficult.

In my last post, Up Against The Wall, I described the dread I was feeling about writing a synopsis for my novel. Dreadful, because it was something new and something really important, but it didn't need to be difficult; it just required effort. I took the necessary actions, completed the synopsis and shipped it off to ten literary agents. Low and behold one responded the next day with interest to read the   entire manuscript! I never expected a response at all let alone a positive one. I understand the odds of gaining representation and just completing the synopsis and sending out submissions was satisfaction in themselves. 

The ice in the glass analogy came to me while running today  as many solutions do. "It's just work, it doesn't have to made difficult," I told myself. Now, I just have to remember that as I open my sketch book and stare at a blank piece of drawing paper.

A late addition and related to the above, my wife shared an All Things Considered segment with me, Struggle For Smarts? How Eastern And Western Cultures Tackle Learning. In it, UCLA Professor James Stigler whose research focuses on understanding processes of teaching and learning says, "I think that from very early ages we [in America] see struggle as an indicator that you're just not very smart," Stigler says, "It's a sign of low ability — people who are smart don't struggle, they just naturally get it, that's our folk theory. Whereas in Asian cultures they tend to see struggle more as an opportunity." In Eastern cultures,  it's just assumed that struggle is a predictable part of the learning process. Everyone is expected to struggle in the process of learning, and so struggling becomes a chance to show that you, the student, have what it takes emotionally to resolve the problem by persisting through that struggle."

Two ways of viewing struggle both of which can help me  accept that actions that may be experienced as a struggle help make me improve and become develop skills.

Saturday, October 6, 2012

Up Against The Wall

Up against the wall and nowhere to go except around or through it. 

Recently, I completed my first novel, Birds Like Us, The Pi Phillecroix Story.  I thought that writing 70,000 plus words over ten years was the hard part and then I learned that I a synopsis would be required by some literary agents for submission. Agh...Really? Must I? Come on! Yes, I do if, I want my work to be seriously considered. 

Different agents require different lengths of the synopsis but in general the less the better. I can't imagine how many submissions that agents receive but I'm sure it's a lot and that they truly are looking for their next hot writer that they and only they will represent.

Writing a synopsis, as the experts say, doesn't have to be difficult but it does take time to construct. I've been putting it off for several weeks now and capitulated today when that wall just would not budge. It's actually coming along nicely after I made the commitment to start. Funny, all it took was a commitment to myself to just start and as Jackie Gleason said, "And away we go!"  

Sunday, September 23, 2012

The Class That Made it Right

        
Day One Self-Portrait
   
Day Five Self-Portrait
One class can change your perception of everything. That's what happen to me after attending the five day intensive class, Draw From the Right Side of the Brain. The class born from Betty Edwards' book of the same name proclaims that anyone can learn to draw just like anyone can learn to read or write. Like many people, I thought that you were either born with artistic talent or you were not; that artists like van Gogh and Rembrandt were naturals; that it was so much easier for them than people like me who liked drawing but found it too hard to do it right. 

For five consecutive days, eight of us 'non-natural' artists learned to draw by quieting our left brain hemispheres and seeing with our right brains. I won't write about Edwards' theory because I'm not qualified to do so. What I can tell you is, all of us who attended the class claimed up front that we were all very bad drawers or couldn't draw at all but wanted to learn. By the third day we proved what thousands of other attendees had previously learned, that drawing 'good' can be learned.

Pictured above are my two pencil drawn self-portraits; one from the first day of class and the second from the last day. Remarkable! I was and am still amazed at the marked improvement that all of us made in such a short time frame. Was it hard? Yes. Did it take a lot of discipline to stay in my seat and not run screaming from the little art studio that held the class? Hell, yes! (Of course, I now know that from a Neuroscience point of view, that was the left hemisphere talking.) But I stayed and as is always the case, the benefits greatly outweighed the struggle. I am seeing in a different way: my perceptions are enhanced and changed. I can see the entire space; the negative and positive. I can directly apply the lessons learned in the class to all problems applying right brain creative solutions. As Edwards writes, "The larger underlying purpose was always to bring right hemisphere functions into focus and to teach readers how to see in new ways, with hopes that they would discover how to transfer perceptual skills to thinking and problem solving." So now, instead of focusing on the problem I can look around it. I can literally turn the problem upside down just as we did when we drew Picasso's famous drawing of Stravinsky upside down.

The class, taught by Edwards' son, Brian Bomeisler was not cheap but taking into consideration that the class compressed approximately three semesters of art school into five days, I'd say that it was a bargain. If you can't or don't want to attend the intensive class, get one of Edwards' books and start seeing things in an entirely new way. Even if you don't want to draw, you'll learn how to quite that noisy, always talking left brain hemisphere and access more of your right brain where the "natural" creative in all of us lives.

Saturday, June 30, 2012

Get Unconscious

I came across John Cleese presenting a talk on "how to be creative". He admitted up front that he had know idea how creativity works and can't explain it. He did, however, go on to explain the magic that comes from our unconscious minds, for within it rest solutions to creative problems and that there are two modes that we can choose when faced with a creative challenge.


If you're anything like me or most people, a blank piece of paper, canvas, or mound of lumpy clay can cause sheer panic. Cleese addressed this when he talked about the importance of accepting that uncomfortable feeling of not having any idea of how to proceed but start we must on that book, painting, sculpture or business plan in spite of the anxiety. He relates that moment when we feel completely lost and stuck to being in a "closed mode" versus the moment we pick up that brush or pen and commit to the "open mode". When we operate from the open mode we allow our imagination to percolate even if we aren't fully aware of what's actually happening. According to Psychology Today, the unconscious mind is the "source for intuition and dreams." This can be very exciting to some and a source of anxiety for others.


Cleese's "modes" are quite interesting, especially since I had the incredible fortune recently to meet Carol Dweck, a Lewis and Virginia Eaton Professor of Psychology at Stanford University. Dweck wrote the mind changing book Mindset. I found it so intriguing that I finished reading it in two days. 


The premise of Professor Dweck's book is that we have a choice of two mindsets: fixed or growth. A fixed mindset believes that people are born with a fixed amount of intelligence, skills and talent. A growth mindset believes that anything can be learned and mastered with hard work and time invested. (Read Malcolm Gladwell's Outliers: The Story of Success) Growth mindsets love challenges and don't give up when things get uncomfortable. Even geniuses like Einstein and Picasso had to learn and put a lot of what they learned into practice. If they hadn't we never would have heard of them. Einstein famously said, "I am neither especially clever nor especially gifted. I am only very, very curious."


Both Dweck and Clesse speak to the importance of taking  frequent breaks along with playing and having fun, especially, when faced with the big "C" word, Creativity. With open or growth mindsets the answers will seemingly come when least expected. Wherever they come from, I can say that after reading Professor Dweck's book and watching the Cleese video, I have had a very productive week in spite of the initial uncomfortableness. 

Sunday, June 24, 2012

gARTning


My Little Plot of Heaven

After two years on the City's waiting list our name came up. A piece of the pie is now ours. The pie is a 10 x 10 plot within a community garden where the vegetables that we've planted will soon be in our salads and on our walls. 

"What? Walls did you say?" You read right. As the zucchinis, cucumbers, peppers, tomatoes, and arugula grow and ripen, I've been using them as studies for drawings and paintings. Inspired by our recent harvest and the plantings of our fellow gardeners, I've continued with my new found practice of ink on rice paper and refer to it as, gARTning.


Pinkies' Tree

Pea Leaves


Rose's Rose


Unrequited Love


Of course, the practice of writing, drawing and painting on rice paper is centuries old but for me it's only a few months and I'm finding the possibilities limitless. Once the radishes are ready to pull from the ground I'll be anxious to get them on paper too.

Saturday, June 2, 2012

Rice. Not Just For Dinner Anymore.


I started playing with the application of ink and water colors on rice paper last week and it's been a lot of fun. The paper is very thin and because it absorbs so well, the water from the ink rips the paper fibers creating an additional texture. The drawings pictured here were done using a brayer for the red and with brush, pen and seagull quill and feathers for the black ink. 


I have a large blank wall to work with and am considering using the 6' long sheets of rice paper that I picked up at one of my favorite stores Pearl River Mart in NYC to ink and then put behind Plexiglas with wood moldings. Stay tuned...

Monday, May 28, 2012

The Lights Are On and Everyone Is Home


Mason Jar Chandelier 
If you don't already know, I like doing whatever I can myself. I cut my own hair, polish my shoes, grow herbs and vegetables, and build furniture to suit my needs. That's not to say that in our small apartment I can create everything I need and want. I once tried to spray paint vintage French glass door cabinets that I trash picked and just about asphyxiated myself. And I'll probably never build myself a pizza oven. So after living for close to two years without enough live/work light I decided to make a lighting fixture. One that would meet my specific needs without costing an arm and a leg. I had long thought of putting light bulbs in the hundreds of peanut butter and applesauce jars that I had eaten my way through. I had also collected my fair share of mason jars and thought that they too could make for an inexpensive solution. In the end I chose the mason jars as they don't come with sticky and hard to remove manufactures' labels and I wouldn't have to wait until I ate my way through ten jars of Crazy Richard's chunky peanut butter.


Before I went about an actual design, I searched the web to see if anyone had built a chandelier made from mason jars or similar. I came across several do-it-your-selfers. The best was posted by Our Hiding Place which led me to Pottery Barn's Exeter 16 Jar Pendant Chandelier. It's a really nice design and lists for $399. I was determined to customize mine and make it for less but I wanted detailed step-by-step instructions and I wasn't finding them anywhere. 


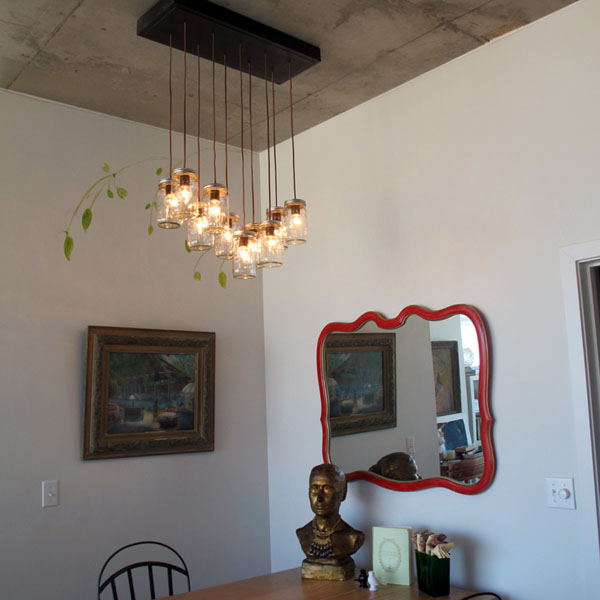
I swore that if my project was successful I would share it with others. I apologize in advance for the quality of the instructional pictures; I was too excited during the building process to focus on picture taking. What follows are instructions on building your own mason jar chandelier based on the one pictured above. (Full steps are also listed on Instrcuctables.)


First thing I did was to determine how much light I needed and what the electrical requirements would be. (Disclosure: I am not an electrician and am not recommending voltage or wiring. Each State has their own codes regarding home wiring. Also, the following instructions will not guide you on how to wire the ceiling leads and wall switch.) 


The space where I planned on having the chandelier is over my dining/art table. (I built the table to again, suit my particular needs.) There is an existing electrical port in the ceiling that unfortunately, due to inept design is positioned too close to one wall restricting the width of a ceiling fixture. After identifying the maximum voltage I could then decide on the number of jars and matching bulb wattage. (Voltage, watts and amps are different. Again, I am not an electrician but am lucky enough to have a friend who is one hell of an incredible licensed electrician. If you don't know what you're doing, consult a licensed electrician.) 


Based on my space and lighting needs, I decided on 10 jars with 25 watt bulbs. (Before you decide on the jars and the bulbs make sure the bulbs will fit inside the jars.) I tested different jars and bulbs first, before committing to the final design. I wanted to make sure that the heat generated from the bulbs wouldn't cause the jars to break or create condensation inside the jars. For the tests I purchased a simple lamp cord kit from the local hardware store. (It's a cord with a plug on one end and a socket on the other.) I already had a couple of mason jars on hand. My test proved successful so I ordered the rest of the needed parts. (See list below.) 


I decided to drill and wire the jars first, build the unit that would house the wiring after and then mount it to the ceiling. Being married to a hat designer helps with measurements. Together, we created a pilot hole template to drill through the lids of the jars where half of the metal nipple and wire passes through.


Thin part of lid (left). Paper pilot hole template (right).
I placed the paper pilot hole template on each lid and then screwed the outer piece of the locking lid on and marked the centered hole in preparation for drilling. 

Ready to drill lids.
Use a 1/4" metal drill bit to drill the holes in the lids and a 1/16" bit to drill 6 small holes around the lid to allow heat to escape from the jar. (I eyeballed the air holes, as no one would see them.) Next, insert the metal nipple through the hole leaving equal lengths on each side of the lid. Be careful, as the lids are very light gauge and razor sharp shards can cut fingers easily. I used a very fine metal sandpaper to remove the shards.


1/8" Hex Nut & 1/8" Nipple
Next, place a Hex nut on both sides of the lid and hand tighten before using a wrench to lock them into place. 

Hex nuts wrenched tight top and bottom.
My wife stepped in again to measure the center of the jars against the width and length of the 'junction' (ceiling) box so that the jars would be positioned proportionately. Holes will be drilled through the red circles in the below picture and the wires will go through them. The wires will ultimately be connected to the lead wires in the ceiling. 

Drill hole marks in 'junction' (ceiling) box bottom. Portion shown will face the ceiling.
(No, you're not crazy, I took the below picture before I wired the keyless sockets.)

Jars being centered on 'junction' (ceiling) box.

With all of the lids drilled and the nipples locked down by the Hex nuts, it's time to wire the keyless sockets as pictured below. Make sure to pass one end of the wire through both parts of the lid, (Mason jars have air-tight lids by having two parts: one is the thin flat piece and the other is the screw-on cap) and then through the nipple. (We wanted the jars to hang 3' from the ceiling and cut the wire accordingly.) Before wiring to the two screws on the socket, you'll have to strip the wire covering with wire cutters. There is a positive and negative wire. It depends on the wire you choose as to which is which.

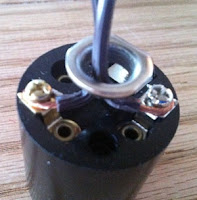
Wired Keyless Socket
After the wire has been passed through both parts of the lid and the nipple, screw the keyless light socket onto the underside portion of the nipple. This is portion of the nipple that goes inside the jar. Screw the bulb into the keyless socket. At this point, your wiring and hardware should look like the picture below.

Lamp wire has passed through the screw cap and the nipple then wired to the keyless lamp socket.
Each jar should now look like the below picture. Before attaching the other end of the wire to the ceiling wires, unscrew the lid and take the glass jar off. You don't want the extra weight at this point.  

Wired socket and bulb in jar.
One of the best products ever invented is probably the Electric Grounding Bar. I used it to 'piggyback' all ten of the wires into two. The two wires will connect to the lead wires in the ceiling. The grounding bar is screwed into the junction (ceiling) box bottom as pictured below. I placed the bars close enough to the lamp cords but far enough away from each other as not to create a short. The corded  lamp wire is poking through the pre-drilled holes. You will be bringing each of the ten lamp wires through the pre-drilled holes in the box's bottom.

Electrical Grounding Bars with corded wire poking through.
Next, split the corded lamp wire so that the two wires are separated from each other, enough to reach each bar. Strip away 1/2" of the wire's insulation and insert into an open hole in the bar. Hand tighten using a Phillips screw driver the bar screws so that each wire is screwed to one side of the bar as pictured below. Using electrical tape, cover any exposed wire.

Corded lamp wire split and screwed to grounding bars.

View from above: all ten lamp wires screwed to grounding bar. 
View from side of the pre-painted bottom of junction (ceiling) box with attached wired sockets and jars.
The most difficult part of this project was creating a box for the wires to be housed and that could be mounted to our concrete ceilings. I wanted to make this as simple as possible so I designed a topless box. You can make this any size you want. I wanted something as narrow as possible but deep enough to hold the wires and hardware. I cut a basic rectangle shape (see parts list below) using a 1" x 8" pine board for the bottom of the box and 1/2" x 2" poplar for the sides. I screwed the sides to the bottom using pre-drilled and countersunk holes and then screwed six 1/2" brackets to the inside portion of the box sides. The brackets were then screwed to the ceiling using a concrete drill bit and drill.

Junction box being mounted to the ceiling.  Box is offset from hole in the ceiling to center it over a table below it.

I am assuming that at this point you or someone else, (a licensed electrician perhaps?) has completed all of the appropriate wiring in the ceiling and on the wall switch. (I used a dimmer switch.) Have someone help you to lift the jars towards the ceiling as you place the box's bottom into place. Screw the box's bottom to the four sides, cover the holes and screws with wood putty and paint with color of your choice. Now, screw the jars back onto their lids. If you measured correctly the jars should hang exactly where you wanted them. Turn the wall switch on and bathe in the light and satisfaction of a job well done.


Have fun and don't forget, I'm not an electrician. If you have questions, please post them in the comments section below the post.

Parts List and costs:
Tools:
  • Wire cutters
  • Phillips head screw driver
  • Electric drill and 1/4" bit
  • Hand saw

Friday, May 18, 2012

She Flies!

Completed Manuscript


She's finished. She's finally finished. Seven years plus in the writing and editing and she's finally finished.


"Birds Like Us: The Pi Phillecroix Story" is a novel for anyone over the age of ten. Now all I have to do is get it published or self-publish but it's good for now just to relish in a goal completed.